


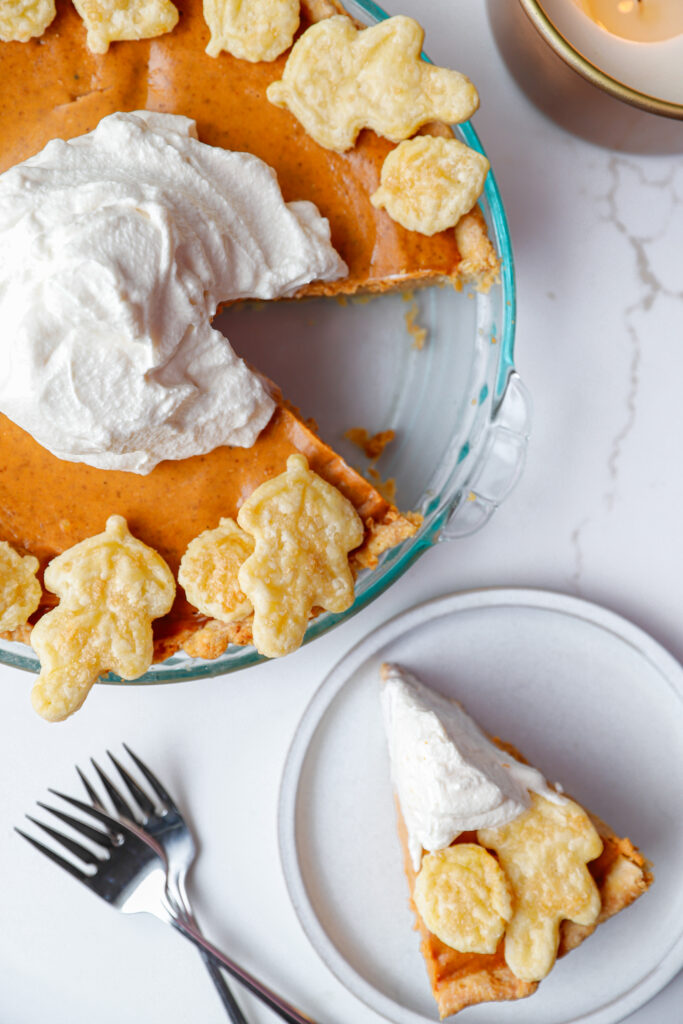
This is Libby’s New Fashioned Pumpkin Pie, the modernized version of their famous can recipe, and the one I reach for every single year. While many people grew up with the original classic version, this updated recipe has a slightly richer sweetness and an ultra creamy texture that just feels extra special on the holiday table. The sweetened condensed milk combined with warm, cozy spices creates a smooth, creamy custard filling that is perfectly balanced and always dependable. While this is not my own recipe, it’s one I truly love, personally use, and confidently recommend when you want a silky, reliable pumpkin pie that delivers every time.

Why You’ll Love This Pumpkin Pie
- Perfect balance of warm spices and creamy pumpkin flavor
- Smooth, creamy custard texture that slices beautifully
- Simple ingredients you likely already have on hand
- Reliable results for holidays and special gatherings

When to Make Libby’s New Fashioned Pumpkin Pie
- Thanksgiving dessert centerpiece
- Fall gatherings and Friendsgiving
- Holiday dessert tables
- Sunday family dinners
- Make ahead dessert for entertaining

Recipe History of Libby’s New Fashioned Pumpkin Pie
Libby’s began printing pumpkin pie recipes on their cans in the late 1920s, helping shape what many families now view as the classic Thanksgiving pumpkin pie. The original version, often referred to as the classic or famous recipe, relied on evaporated milk and a traditional spice blend that became the gold standard for decades.
In recent years, Libby’s introduced a second option called the New Fashioned Pumpkin Pie. This modernized recipe incorporates sweetened condensed milk and adjusted spice ratios to create a creamier texture and slightly sweeter, more luxurious finish. Both recipes now appear on the can, giving home bakers the choice between the original classic and this updated, richer version.
This post specifically features the New Fashioned Pumpkin Pie and reflects Libby’s modern approach to a timeless dessert.
Tips for Perfect Texture Every Time
To ensure your pumpkin pie sets beautifully with a smooth, creamy texture, follow these simple tips that make all the difference.
- Do not overmix the filling. Stir until just smooth to avoid air bubbles that can cause cracking.
- Bake until the center has a slight jiggle, not a wet slosh. The pie will continue to set as it cools.
- Let the pie cool completely at room temperature before refrigerating to prevent condensation and a soggy surface.
- Chill the pie for at least 4 hours, or ideally overnight, for the best sliceable texture.
- Use room temperature eggs and dairy for a more even, silky custard.
FAQs
Can I make this pumpkin pie ahead of time?
Yes. This pie is best made one day in advance. Chilling overnight improves texture and flavor.
Do I have to blind bake the crust?
No, but blind baking helps prevent a soggy bottom and creates a slightly crisp texture.
How do I know when the pie is done?
Insert a knife near the center. It should come out mostly clean and the center should still slightly jiggle but not look wet.
Can I freeze pumpkin pie?
Yes. Wrap tightly and freeze for up to two months. Thaw overnight in the refrigerator before serving.
Love This Recipe? Try These Next
If you love this pumpkin pie, try these other cozy pumpkin recipes:
- Pumpkin Magic Cake
- Easy Pumpkin Cake with Cream Cheese Frosting
- 2-Ingredient Pumpkin Cookies
- Pumpkin Spice Monkey Bread

Libby’s New Fashioned Pumpkin Pie
Ingredients
Pumpkin Pie
- 2 large eggs room temperature
- 15 oz can Libby’s 100% Pure Pumpkin
- 1/2 tsp salt
- 1 tsp cinnamon
- 1/2 tsp ground ginger
- 1/2 tsp ground cloves
- 1 cup evaporated milk
- 1 (14 oz) can sweetened condensed milk
- 2 pie crusts homemade (see below for a link to my all butter pie dough recipe) or store bought
Pie Chips and Decorations
- 1 egg white
- 1 tsp water
- 2 tbsp turbinado sugar
Whipped Cream
- 1 cup heavy whipping cream
- 3 tbsp powdered sugar
- 1/2 tsp pure vanilla extract
Method
Blind Bake the Pie Crust
- *Libby’s recipe notes that blind baking is optional, but this step creates a crispier bottom crust.Preheat oven to 375°F.
- Place pie crust into a pie pan and crimp edges. Gently pierce the bottom with a fork. Line with parchment paper and fill with pie weights or dried beans.
- Bake for 15 minutes. Remove weights and parchment and set aside.
Make Pie Chips and Designs
- Roll out the second pie crust. Use cutters to stamp fall shapes.
- Whisk egg white with water and brush over cutouts. Sprinkle with turbinado sugar.
- Bake at 375°F for 12 minutes until golden brown. Set aside to cool.
Prepare Pumpkin Filling
- Preheat oven to 425°F.
- In a large bowl, beat eggs. Stir in pumpkin, salt, cinnamon, ginger, and cloves. Gradually mix in evaporated milk and sweetened condensed milk until smooth.
- Pour into prepared pie shell.
- Bake at 425°F for 15 minutes. Reduce temperature to 350°F and bake 30 to 40 minutes until set but slightly jiggly in the center.
- Cool on a wire rack for at least 2 hours, then refrigerate overnight if possible.
Make Whipped Cream
- Whip heavy cream, powdered sugar, and vanilla until soft peaks form. Do not overmix. The texture should be light and fluffy.
Top cooled pie with whipped cream and decorative pie chips before serving.
Notes
Recipe Credit
This recipe is the Libby’s New Fashioned Pumpkin Pie recipe sourced directly from the back of the Libby’s 100% Pure Pumpkin can. This is one of the two official Libby’s pumpkin pie versions and the exact recipe used and referenced throughout this post.


What did you think?